Antes de postar o Tutorial, para você entende-lo perfeitamente, tera que usar o Google tradutor, pois eu achei o tuto de um site americano, e é muita coisa pra traduzir;
Para traduzi-lo, basta clicar na bandeira do Brazil, no gadget do lado esquerdo do fórum, emcima do contador de visitas;
Final Image:Here is the final image that we will be creating:
 Step 1:
Open up a new document 1000px wide and 600px high. Then paste an
image of a laptop into your document. Create a new layer set called
‘laptop’ and put the layer containing your laptop image into this layer
set.
 Step 2:
Now I want to create a vanishing point for the screen of the laptop.
Many Photoshop users, including myself, don’t yet have Photoshop CS2 or
CS3, so this tutorial won’t utilize the useful vanishing point filter
available in these versions. Instead, we’re going to manually create a
fake vanishing point.
Select the screen part of your laptop using the lasso tool. Then copy
your selection, create a new photoshop document, and paste in the
selection. Go to image>image size and double whatever your image size
is. In this case the original screen was 204px wide, so I simply
doubled this to 408px.
Then paste this new larger screen back into your original document.
Positioning it roughly where you think it looks good in terms of
perspective.
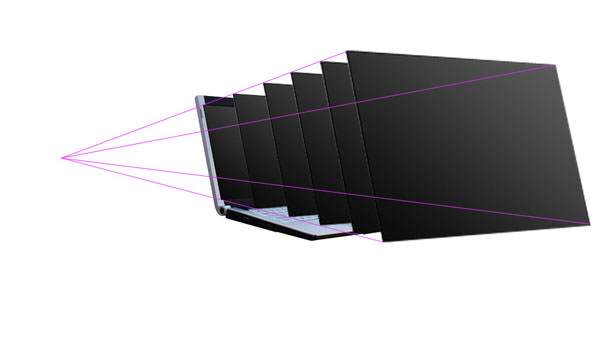
 Step 3:
Now select your line tool and a nice bright color for it and draw
lines each corner of your large screen through to the matching corner of
the original screen and past to a vanishing point. Do this with each
corner of the laptop screen, until you have something like the image
below:
 Step 4:
Now duplicate your larger laptop screen and select edit>free
transform. Then in the menu near the top of your screen (see diagram
below) change the W (width) and H (height) percentages from 100% to 90%.

Move this resized image so that it matches up with the perspective
lines that you created earlier. Be sure to place this resized screen
layer behind the largest screen layer but above your original laptop
photo layer.
Repeat this process of duplicating/resizing/aligning using the
resizing percentages of 80%, 70%, and 60% from your large screen layer.
Remember that your original laptop photo is 50% of this large screen
layer.
This is how your image should look after you have created this new screens and lined them up correctly:
 Step 5:
Now create a new layer set called ‘photo 1′. Paste in the image that
you want to manipulate. View a grid over your image and then use the
free transform tool to resize your photo to fit nicely into the grid
squares. Make sure that the photo fits into an even number of grid
squares for it’s height and width. In this example the photo is resized
to be 8 grid squares wide and 6 high.
 Step 6:
Now duplicate your photo layer, as you want to retain a copy. Be sure
to hide the duplicate layer and go back to your original. Select your
single column marquee tool from your selection palette (it’s under the
Rectangle and Elliptical marquee tools). Using your grid click the grid
line that marks the center point of your image and delete a central 1px
column. Then switch to the single row marquee tool and do the same to
delete a 1px line across the center of your image. You want these lines
to be a little larger than 1px though, so grab your magic wand tool and
click somewhere outside of your photo image. This will select all of the
area surrounding the photo, but also the 1px lines cutting through it.
Then go to select>modify>expand and expand the selection by 3px.
Then hit delete to achieve an effect like the image below:
 Step 7:
Now hide all of your duplicate laptop screens except the smallest one
(the one that is 60% of the size of your largest). With your photo
layer selected (the one you’ve just cut up using the grid) go to
edit>transform>distort and distort the photo so that it fits
exactly over this smallest laptop screen image. To fit it well you make
need to reduce the layer’s opacity to allow the screen underneath to
show though. The image below shows the transformed photo layer at 57%
opacity, allowing some of the screen underneath to show through. Be sure
to move this photo layer below the next largest laptop screen layer, so
that it is mostly covered by it.
 Step 8:
Now go back to your original photo layer. Duplicate it again, and
using the same technique as before with the single row/column marquee
tools cut it into 2X2 squares using the grid. As the image is 8 squares
wide and 6 high, this will result in 12 squares each 4 grid squares in
size. Again, use your magic wand tool to select the area around the
photo and the lines cutting through it, then expand your selection by
3px and hit delete. Then use the distort transform tool to fit your new
image to the 2nd smallest laptop screen. Remember again to move this
photo layer behind the next largest laptop screen layer. The image below
shows the result of this, with the photo layer again at 57% to allow me
to nicely fit it to the screen image beneath.
 Step 9:
Now repeat these steps, but make your squares half the size each
time. So using the grid that will then be 1X1, 1/2X1/2, 1/4X1/4. To cut
the photo into 1/2 and 1/4 grid square pieces I would recommend just
using your judgement, but if you want to be really picky you can use
rulers. Another tip is to duplicate the photo after cutting it into the
squares, as this will save you having to repeat the slicing process
right from the start each time.
 Step 10:
Here is the same image but with all duplicate laptop screen image layers hidden and all photo layer’s with 100% opacity.
 Step 11:
Now is the time-consuming part. Hide all of your photo layers except
for your smallest photo layer. Use your magic wand tool set at 255
tolerance to select entire squares and delete them to leave a
checkerboard effect. To do this simply go down each column deleting
squares, being sure to leave a square remaining between each two that
you delete. Then move onto the next column and repeat, but make sure
that no squares you delete are next to an already deleted square,
deleted squares should be diagonal to each other. The image below shows
the various stages of doing this with each photo layer:
 Step 12:
You should still have your original photo layer, as it was duplicated
for safe keeping near the start of the tutorial. Duplicate the layer
again, and move it so that it is the first layer above your laptop image
layer. Then go to edit>transform>distort and fit the photo nicely
over the laptop screen. Then hide all of your vanishing point
guidelines and make sure that all of your checkerboard photo layers are
visible. Seeing as all these layers are within the same layer set select
the layer set and drag it to make the graphic more central in your
document.
 Step 13:
Right click on one of your photo squares layers and click blending
options. Apply the drop shadow settings shown below. Then once this has
been applied right click on the drop shadow shown in your layers
palette, select ‘copy layer style’ and paste the layer style to all of
your other photo squares layers. The outcome is shown below:

 Step 14:
Now create a new layer set below your laptop/photos layer set called
‘background’. Hide your laptop/photos layer set. Create a new layer and
fill it with a white to light gray radial blur.
 Step 15:
Paste a metal texture onto a new layer above your radial gradient
layer and reduce it’s opacity to 20% for a subtle textured effect.
 Step 16:
Now create some bendy lines across your background using the pen
tool. Be sure to have a white 1px brush selected and then once you have
created your bendy pen line right click on it and select ’stroke path’.
Then simply duplicate your line layer until you have multiple white
lines across your background. I merged all of my line layers together
and reduced the merged layer opacity to 30% for a more subtle effect.
 And we’re done!
To finish things off I added some cool text. Click the image below if you want the full sized version.